
An onboarding flow helps your team agree how a new user reaches something they can use. For a product manager, the useful work is deciding what that result looks like, what information it needs and which setup choices can wait.
Write the result first, then work backwards through the required steps and recovery routes. This guide follows a first planning board, with an editable user onboarding flow example and a reusable worksheet.
Define a result someone can recognise
Completing a welcome screen does not explain what the person can now do. Give the endpoint a concrete description, such as “a saved plan for my project, with a task I can start”. That description gives the team a way to judge the steps before it.
Figma describes user flows as the steps taken to complete a task. Set the boundary from that task: account access may happen earlier, and advanced learning later. Include a step when the chosen result needs it.
The first useful result depends on the person. Someone starting a personal project needs a different route from someone joining an existing team. Choose one situation for the first draft, then review the other roles separately.
Start with one planning task
Our worked example is a fictional project tool. A person already has account access and wants to plan the launch of a workshop page. The proposed endpoint is a saved board named “Workshop launch”, containing the task “Draft booking page” and a clear way to open that task.
Your job is to agree the route and the product rules. The person's job is to leave with a plan they can find and continue. Saving, access permissions, defaults and resume behaviour still need confirming in the example.
Write this review question beside the map: “Which steps are required to create the first useful plan?” The endpoint must contain their own project and a meaningful next task. Label any demonstration content as a sample until the person replaces it.
If account access still needs agreement, use the signup flow guide to review validation and verification before mapping the first planning task.
Separate required inputs from later choices
With the endpoint in place, list the information needed to create it. This example proposes the following split:
| Input or step | Needed for this first result? | Reason |
|---|---|---|
| Account access | Yes; established at the start | The person needs to return to their saved board |
| Board name | Yes in this proposal | Identifies their project |
| First task title | Yes for the useful result | Gives the plan a concrete next action |
| Profile customisation | Later | Does not define the personal planning task |
| Invitations | Optional after the result | Sharing is a separate choice for this solo plan |
| Advanced preferences | Review later | Keep suitable defaults unless a setting is necessary now |
Give every required field a reason. Distinguish the system's minimum input from the content that makes the result useful; an untitled empty board may satisfy one requirement without helping the person plan.
Keep genuine access and consent requirements. If joining a shared workspace requires an invitation or a particular role, those steps belong before creating or changing its content. The example postpones invitations because it follows a solo planning task; it does not make them optional in every product.
Give each deferred choice a destination, such as board-sharing controls or account settings. The person still needs a way to find it when it becomes relevant.
Draw the route in EpicDraw
Open the user onboarding flow template near the top of this guide. It adds a fresh editable page and preserves your existing drawings. You can also download the worked example and open it with the app's Import option.
The main route starts with account access, creates a solo board, collects its name and first task, checks the required input and saves the plan. Missing information returns to the input step. A failed save returns to saving after the person has an appropriate recovery action. Later choices sit outside that main route.
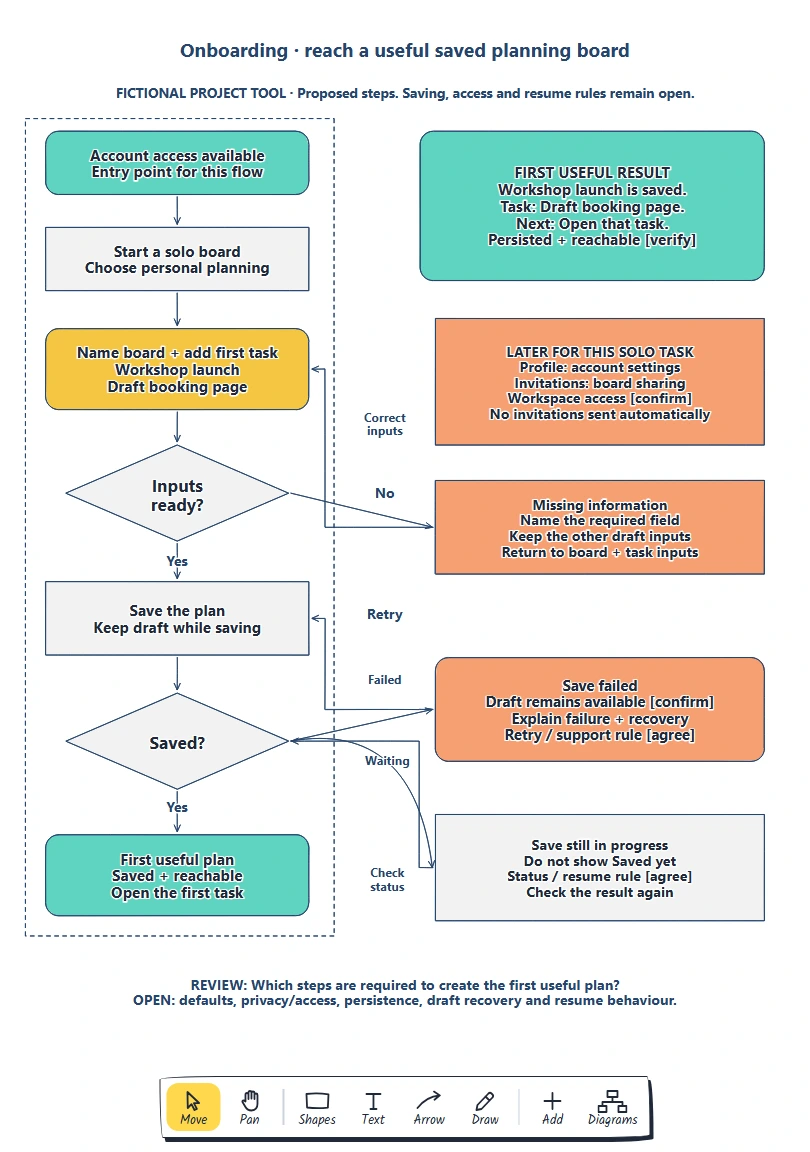
The main route ends at a useful saved plan. Recovery branches show how someone continues; the later-setup area records choices that can wait for this task.
Double-click a label to edit it. Replace the result definition, then its required inputs. For a reporting tool, the result might be a saved report answering a specific question; map the data and choices that report needs.
Keep the decision labels explicit. “Inputs ready?” checks the proposed board name and task title. “Saved?” checks whether persistence has been confirmed. The person needs different messages and actions when either answer is no.
Put guidance beside the action it supports
The input step gives the person a small job: name the project and write a task they can start. Put an example beside those fields, such as “Workshop launch” and “Draft booking page”. Explain why the input helps before asking for unrelated details.
Nielsen Norman Group's discussion of onboarding tutorials and contextual help describes the problems of showing guidance away from the task that needs it. Use help near the current action, and leave a way to return to it. A tour can still serve a specific need; review whether its information is useful at that point.
For a missing board name, proposed copy could be “Name your board so you can find this project later.” Keep the task title and other usable draft information available while the person corrects the gap. Check the actual validation and preservation behaviour when the product is implemented.
Connect correction back to the input step so the person can fix the gap. Assign an owner to unresolved rules, such as whether saving a draft permits a blank task.
Confirm saving before celebrating the result
Separate pressing Save from a confirmed save. For failure, record how the draft remains available, what the message explains and which recovery action is appropriate. Agree whether closing the page or losing the connection permits resuming.
Do not show “Saved” while the outcome is still unknown. Decide how the interface explains waiting and how it recognises success. W3C's status-message guidance addresses informing assistive technology about inline status changes without moving focus. Record that requirement for the implemented interface; a status label in a diagram cannot establish accessibility behaviour.
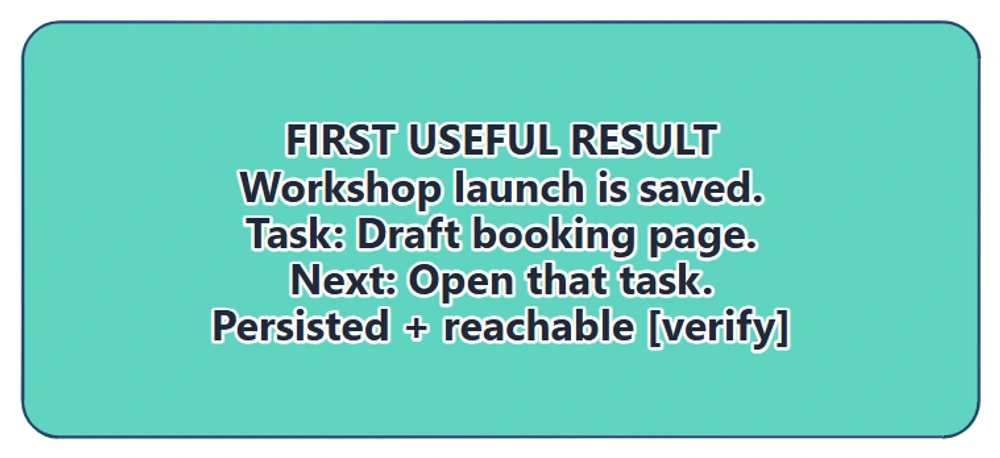
The result definition identifies what must be saved and what the person can do next. A success message should describe that result, rather than just the end of setup.
Proposed confirmation could be “Workshop launch is saved. Open Draft booking page to continue.” Check that the board is actually persisted and reachable with the agreed access before using that wording. Keep sample content distinguishable from the person's own work.
Use the interface state board to inventory what each screen shows while it waits, completes or fails, and name the next action.
Review the result and the route together
Ask a teammate to plan the workshop page using the map. Have them explain the required input, a missing-field recovery and the save result. Then ask how they would continue the task or invite a colleague later.
Record any step they cannot explain. If a field's purpose is unclear, improve its label or nearby guidance. If the product rule is undecided, assign the decision to its owner. Removing the field will not resolve an access requirement or an unknown save rule.
Review with intended users and test the implemented route. A colleague walkthrough reveals questions; usefulness, activation and retention need their own evidence.
Review checklist
Use this user onboarding flow checklist before sharing:
- The person, starting point and useful result are concrete.
- Each required input has a reason connected to that result.
- Deferred choices remain reachable when needed.
- Missing information has a message and return route.
- Saving, waiting and failure states are distinct.
- Confirmation points to persisted work and a clear next action.
- Access, defaults, recovery and resume rules are agreed or visibly open.
Copy this worksheet to review your own flow:
Person and task:
Starting access or prerequisites:
Useful first result and next action:
Required input / reason:
Deferred choice / later destination:
Missing-information and save-recovery routes:
Evidence needed before showing success:
Open rule / owner / next review date:
User review or implementation check:
Optional: create the example with an AI assistant
MCP connects an assistant to EpicDraw's diagram tools. If your assistant supports remote MCP with OAuth sign-in, it can create an editable draft of this onboarding map.
Use a free EpicDraw account, enable cloud sync and approve permission to create and edit diagrams. Open More, choose Connect AI assistant and add https://epicdraw.app/mcp in your assistant. Only synced pages are available to the remote server. The MCP connection guide explains the steps.
Paste this prompt into the connected assistant:
Using the connected EpicDraw MCP server, create a new editable page named "First-value onboarding map". Leave existing pages unchanged.

Map onboarding for a fictional project tool from account access to a first useful planning board. Distinguish required inputs from optional profile and invitation steps. Add a recovery path for missing information and a note explaining what counts as a useful first result.

Use editable shapes, text and connectors. Label the example as fictional and mark unknowns as open questions. This is a visual planning draft. Check for overlapping objects and overflowing labels, then return a PNG preview and the private editor link. Leave the result as a draft for me to review.
Inspect the preview and open the private editor link while signed in. Check required inputs, recovery arrows and the useful-result definition before adapting it. Layouts may differ from the screenshots. The result is a planning diagram; it does not build a project tool, save a working plan in that fictional product or send invitations.
Takeaways
- Define a recognisable first result before choosing onboarding steps.
- Give each required input a reason and each later choice a destination.
- Keep guidance and recovery beside the action they support.
- Confirm persisted work and offer a useful next action.
- Review usefulness with the intended people instead of inferring it from completed setup.
Keep your next draft close
Create a free account to save your pages in the cloud and use them across devices.
Create a free accountYou can keep drawing without an account.