
A signup flow helps your team agree how someone creates an account, verifies it and recovers when something goes wrong. This guide explains what the flow needs to show, then walks through mapping one: define the starting point, connect the steps, add recovery routes and review the behaviour before designing the screens.
The steps work for your own registration process, and there's an editable signup flow diagram template you can adapt as you go.
What a signup flow needs to show
A signup flow shows the actions and decisions between starting registration and reaching an account someone can use: what the person does, how the system responds and where they go next.
That gives your team questions to answer before drawing the interface. Does submitting the form create an account straight away? Must the email address be verified first? What happens if the verification link expires?
Figma's introduction to user flows recommends defining the person's goal, entry point and endpoint, then mapping the steps and decisions between them.
You can decide which screens those steps need once the behaviour is clear. A form with an error may be another state of the same screen; checking an inbox takes the person outside your product.
Give the flow a clear start and finish
This guide follows a fictional planning tool where a new user wants an account so they can save a project. We'll use email-and-password registration, with proposed account states and messages for your team to review.
Start with the person's task: "Create an account so I can save my project." The registration form is our starting point. Completion is a verified account with a clear next action. Sending the email sits between those points, because the person still needs to open it and follow the link.
Write those boundaries above your diagram. If someone suggests profile questions or a tutorial, ask whether they belong before verification or after the first task. Social sign-in and invitations can have separate flows if your product uses them.
Build the successful path in EpicDraw
You have the task and the boundaries. Now connect what happens when the checks succeed.
Open the editable starter near the top of this page. It adds a fresh page alongside your existing drawings. Replace the bracketed labels with the details your team has agreed. No account is needed.
For our example, the path works like this:
- The person enters their email and password.
- The system checks the details and whether the address belongs to a new account.
- It creates an unverified account and sends a verification email.
- The person checks their inbox and opens the link.
- The system accepts the link, verifies the account and offers the next task.
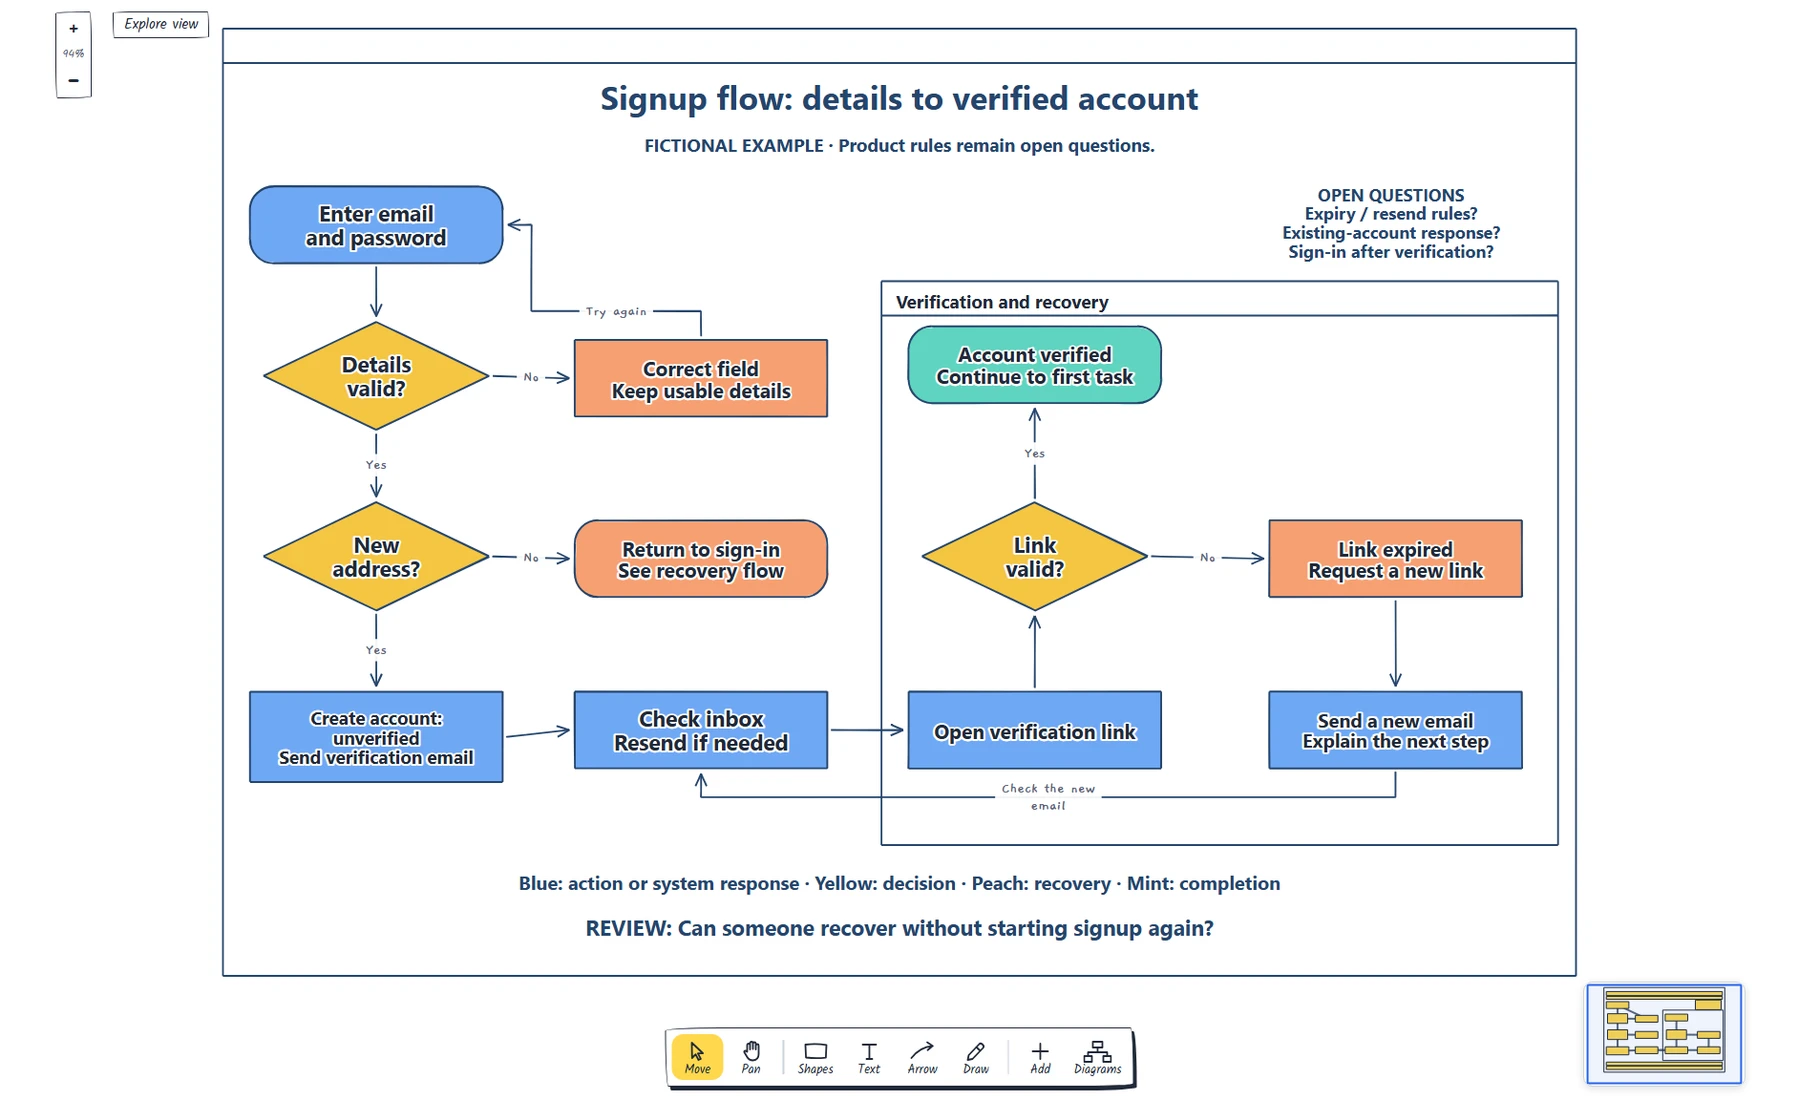
The complete worked example, captured from the EpicDraw editor. The recovery branches connect back to a useful next action.
Double-click a label to edit it. Name actions clearly, such as "Send verification email". Put questions in decision shapes and label the outgoing connectors "Yes" and "No", so the team can follow what happens when an answer changes.
Keep the labels clear enough to carry the meaning without colour. Confirm the account states with the implementation team: your product may create the account at a different point or require sign-in after verification.
Download the filled-in example from the quick-start panel to inspect it alongside your starter.
Give validation errors a way back
The successful path now has a "Details valid?" decision. Follow its "No" branch. The person has already entered information: what needs to change, and which usable details can remain?
In the example, an invalid email sends them to "Correct field" and then back to the form. Write a proposed message beside that branch, such as "Enter an email in the format name@example.com". It tells someone what to change; "Invalid input" leaves them to work it out. W3C's guidance on form notifications recommends clear messages that identify the relevant field and explain how to correct the problem.
Use the same approach for the other checks. This worksheet pairs each condition with a next action and a decision the team still needs to make:
| Condition | Proposed next action | Question for the team |
|---|---|---|
| Email format fails validation | Correct the email and submit again | Which usable details can remain safely? |
| Password fails the agreed rule | Explain the unmet requirement; edit the password | What rule has actually been agreed? |
| Address belongs to an account | Return to sign-in or the separate recovery flow | What may the public response reveal? |
| Verification link has expired | Explain expiry and offer a new link | What expiry and resend rules apply? |
Treat password handling as a separate implementation question. "Keep usable details" does not mean storing a password in the diagram or preserving every field indiscriminately.
The existing-account branch names an internal condition. Agree the public response with whoever owns account security. Show the return-to-sign-in route and the separate recovery flow if the person cannot sign in.
Follow verification through an expired link
Once the form can recover, follow the email branch. The person leaves your product to check their inbox, so the waiting state needs to explain what they are waiting for and how to request another email.
In our example, "Check inbox" includes a resend action. Opening the email leads to "Link valid?" A valid link reaches the verified-account state. An expired link explains the problem and offers a new link; the resend response leads back to checking the inbox.
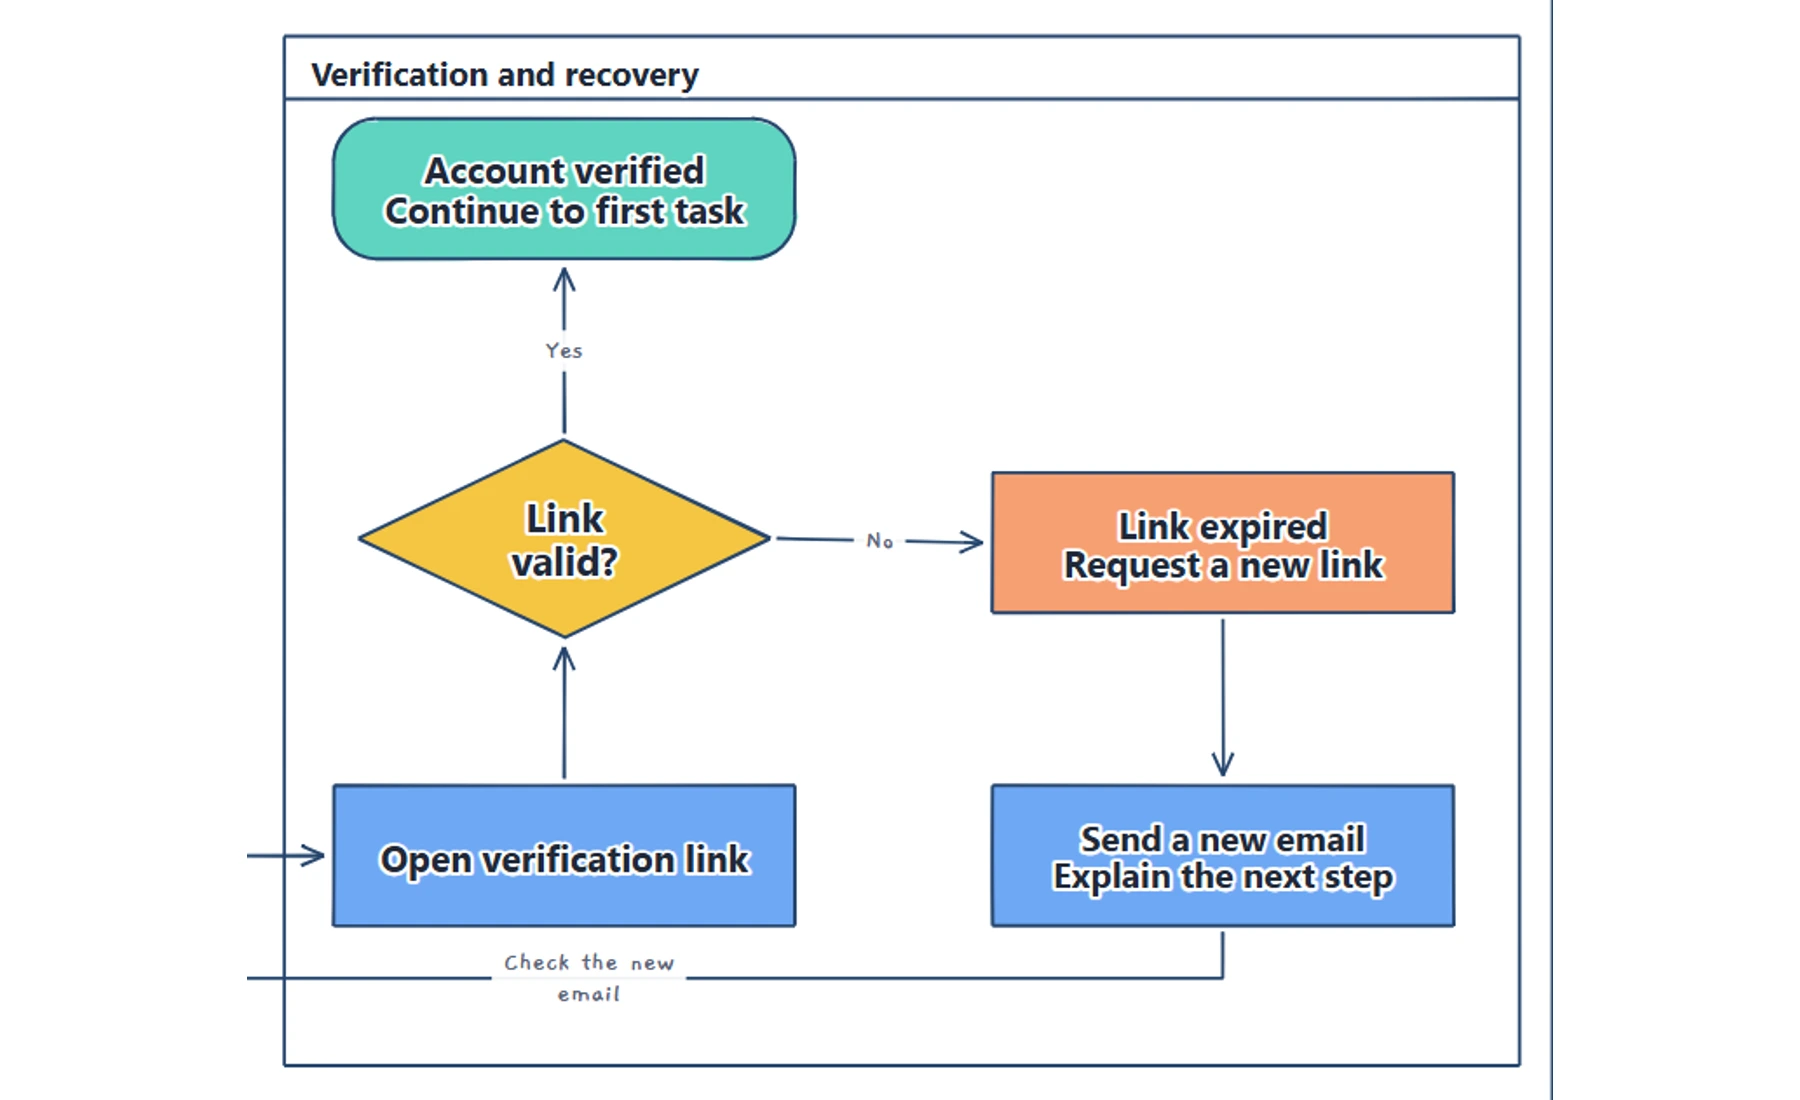
A closer look at verification. The expired-link branch shows how someone gets another attempt without repeating signup.
Walk through that loop with a teammate. If your product requires another step, add it and explain why so they can follow the return route.
Leave unsettled details, such as expiry duration, resend limits and older links, beside the relevant step with an owner. Add a follow-up note for missing emails or connection failures if those routes still need designing.
Use the flow to decide which screens you need
Ask a designer and an engineer to follow the successful signup and recovery routes without your explanation. At each stop, ask what the person sees and what they can do next.
Record their questions beside the relevant step. If a connector is hard to follow, adjust its position or label. If the rule is unsettled, ask its owner to decide it before you write the screen's message.
Then name the screen states from the agreed behaviour. An invalid email may belong on the existing form. The waiting message needs a next step. In our example, "Continue to first task" could become "Create your first project" once the team agrees that destination.
Keep the task and open questions on the page so someone reviewing it later has the same context.
Once you have agreed a screen's task and states, follow how to create a low-fidelity wireframe to turn that decision into a layout your team can review.
Review checklist
Use this signup flow diagram checklist before sharing:
- Name the starting point and the exact completion state.
- Label the outcomes of every decision.
- Explain each error and show the person's next action.
- Trace correction, sign-in and resend routes to a useful destination.
- Check whether someone can recover without re-entering everything.
- Agree the public response for an existing account with its responsible owner.
- Name the action after verification, including any required sign-in.
- Give each unresolved product rule an owner and a next step.
Copy this worksheet to record what the review changes:
Person's task:
Signup starts when:
Signup is complete when:
Condition or error:
What the person sees and can do next:
Unresolved rule:
Next change, owner and review date:
Keep the editable page for future changes. A screenshot is useful for discussion; the native backup keeps the shapes and connectors editable. See EpicDraw help for backup instructions.
Optional: create a first draft with MCP
If you use an AI assistant that supports remote MCP with OAuth sign-in, you can ask it to create this signup flow in EpicDraw. MCP is the connection that lets the assistant use EpicDraw's diagram tools.
This route needs a free EpicDraw account and cloud sync. Only synced pages are available to the remote server. Add https://epicdraw.app/mcp to your assistant and allow it to create and edit diagrams when you approve the connection. The MCP connection guide walks through the steps.
Paste this prompt into the connected assistant:
Using the connected EpicDraw MCP server, create a new editable page named "Adapt website-sign-up with error and resend branches". Leave existing pages unchanged.

Map a fictional signup flow from entering an email and password to a verified account. Include invalid details, an address already registered, an expired verification link, resend, and return-to-sign-in paths. Label success and recovery branches; keep any product-specific rules as open questions.

Use editable shapes, text and connectors. Label the example as fictional and mark unknowns as open questions. This is a visual planning draft. Check for overlapping objects and overflowing labels, then return a PNG preview and the private editor link. Leave the result as a draft for me to review.
Open the returned preview and private editor link, then check the labels and recovery routes. Assistant layouts vary, so the prompt does not guarantee the arrangement shown here. Your team still needs to agree the rules and build the signup behaviour.
Takeaways
- Define completion before mapping signup so the team knows what the journey must achieve.
- Connect each failure to a useful next action and follow it back into the journey.
- Use the review to separate unclear diagram labels from undecided product rules.
- Agree the behaviour before assigning screens, and keep unresolved questions with their owners.
Keep your next draft close
Create a free account to save your pages in the cloud and use them across devices.
Create a free accountYou can keep drawing without an account.